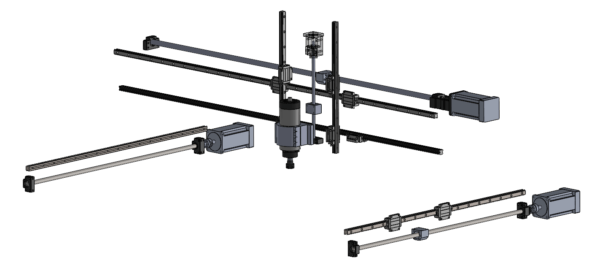
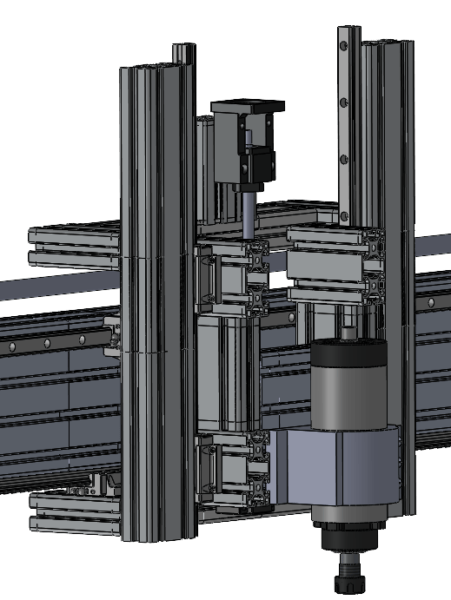
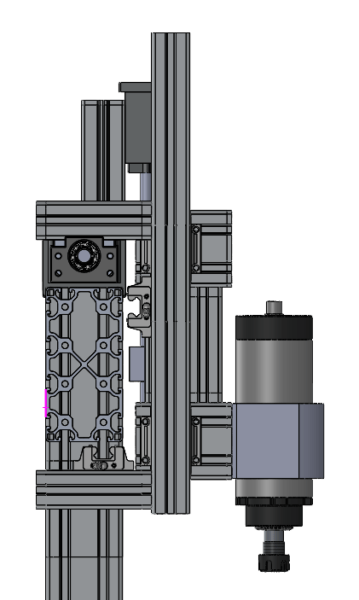
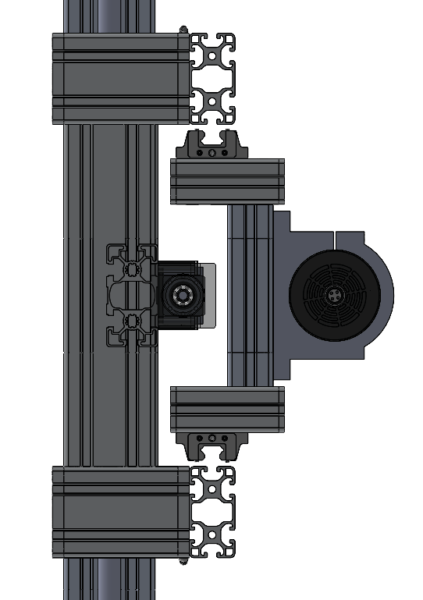
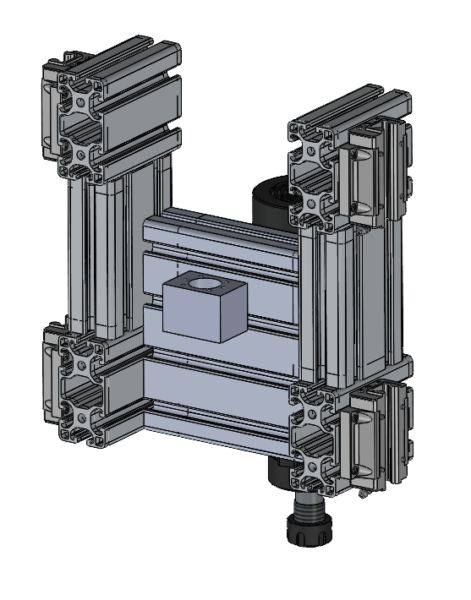
After determining the type, size, and spacing of the major components in the router (bearings, screws, motors) they can be laid out in a 3D model where connection options become more obvious. Because mechanical design is a creative process, I like to start by taking a shot at designing something entirely on my own without taking a detailed look at any similar solutions (which could bias my own design process). The result is never a great design, but it might contain one or two innovations or perspectives that could combine well with other people’s work in a future iteration after more research has been done.
Connection Concepts
Before jumping in to CAD it is good to think about all of the connection options available for the various components so they can be considered and traded.
T Slot Extrusion
There are plenty of plates, gussets, and adapters for T slot framing that let you joint them together in various arrangements. What most of these joining options lack, and what you really want when making a stiffness driven machine like a CNC router, is the ability to preload the joints between T slot extrusions, especially when they form a ‘T’ or ‘L’ joint. The difficulty comes from the T slot extrusion providing multiple great mounting surfaces for radial connection (using the slot) but limited methods for axial connections that don’t simply rely on friction.
One method to add preload in the axial direction of a piece of extrusion is to use the holes in the end of the extrusion. Typically, each ‘module’ in a T-slot extrusion has a hole sized perfectly to receive a common fastener thread. The other half of the setup needs to provides a clearance hole for a fastener to pass through and access the threaded hole, as well as a surface for the head of the fastener to clamp against. These fasteners can cost between $0.25 and $1.00, depending on material and coating.
Another common method for preloading ‘T’ joints is using anchor fasteners. This type of joint requires machining a hole into the side of one of the mating extrusions where a special sleeve can be dropped in. The edge of the machined hole reacts axial force on the sleeve, and so a fastener placed through the sleeve, along the slot, and threaded into a standard t-slot nut on the other extrusion can provide preload between the two pieces. These fasteners can cost $2-$4 per set, depending on shipping and quantity, so the cost of using them adds up quickly.

Rails
One obvious benefit of using t slot extrusion is that the rail can be mounted directly to the slots. Unfortunately, most bearing manufacturers recommend that you set the side of the rails up against a reference edge to keep them straight, which is not present on the extrusion.
There are alternate installation methods available (usually using a dial indicator to set parallelism to an external reference) when a reference shoulder is not available for locating the rails. If the rails were being mounted to a super-stiff giant steel frame it might be worth worrying about this, but the relatively low stiffness of a bolted aluminum extrusion frame will likely be a larger source of error than the lack of a super-straight reference feature for the rails.
Rail Bearings
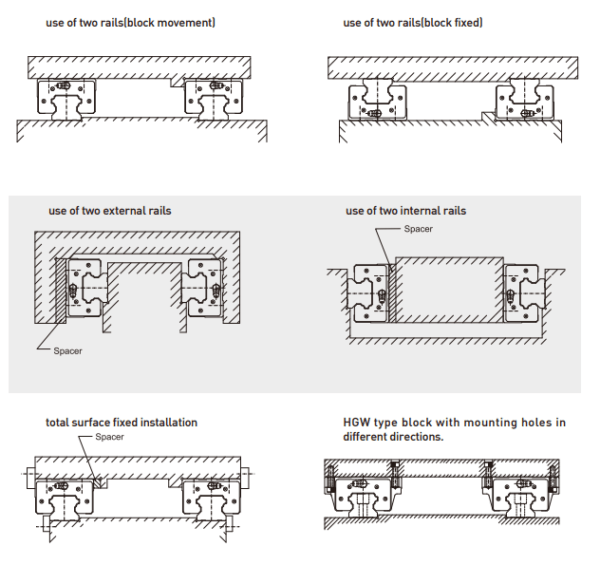
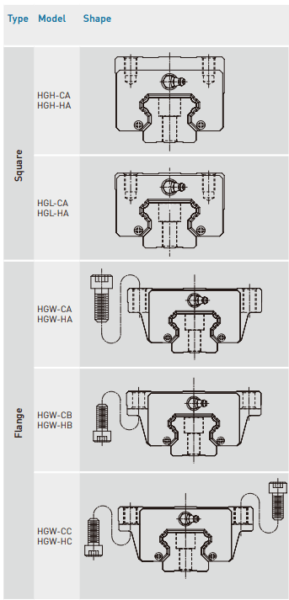
There are a few options for bearing format that impact their ability to be mounted, and from which direction they can be fastened. In all cases, there are four holes in each bearing block, meant to interface with M6 bolts.
In the 20mm rail series, it is worth noting that the HGW series has an axial hole spacing of 40mm, which lines up extremely well with the pitch of 40mm T slot extrusion. The HGW series does seem to be slightly less available than the more common HGH series. In both cases, an edge reference feature on the mounting surface would be extremely useful due to the lack of a similar reference on the rail side, but mounting directly to extrusion is unlikely to include this kind of feature.
Screw Supports
There are multiple common ball screw end supports, but the ‘B’ type appears to be the most available. There are minor dimensional differences between the various types (center height of screw, mounting hole pattern) but not much else to make you prefer one over another.
There is a ‘fixed’ side that uses a nut to capture the screw axially. It has four mounting holes because it must resist the full axial load of the ball screw, as well as screw whip in the radial direction. The ‘free’ side only provides radial support to the end of the shaft and has two mounting holes because it only fights against screw whip. Preload on the fixed bearing directly translates to stiffness in the primary degree of freedom for that axis.
It is worth noting that for 12mm and 16mm screws, the corresponding fixed and free supports have a lateral mounting hole spacing of 46mm, which is extremely close the nominal slot spacing in 45mm t-slot extrusion.
Ball Nuts
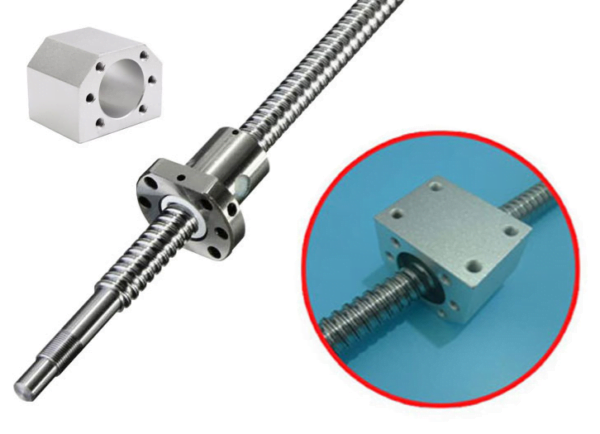
There are already a widely available series of aluminum housings that adapt the flange commonly found on ball nuts to a simple planar mounting interface.
Unfortunately, this common design has bottoming threaded holes as the mounting interface which makes it especially difficult to connect to T slot extrusion. Connecting this housing to a plate with clearance holes, not an extrusion, is significantly more practical.
One way to potentially connect to extrusion is to drill clearance holes into the extrusion, through the slots. If this approach is taken then it is worth noting that the housing for 16mm screws has a 40mm lateral hole spacing (potentially adaptable to 40mm T slot). The housing for 12mm, 16mm, and 20mm screws all have a 24mm axial mounting hole spacing (potentially adaptable to 25mm or 1 inch T slot).
Axis Motors
The stepper motors that drive each axis need to be mounted in a way that supports their own weight (during acceleration events too for the X and Z motors) but also reacts all of the torque they put into the screws. Because a flexible coupling can be used between the screw and the motor shafts the motors don’t need to be mounted perfectly in line with the screw. This might make it easier to come up with a quick 2D plate to connect the motors to some nearby framing.
One interesting option for mounting the steppers is to use an integrated version of the fixed screw support block (commonly available with the ‘B’ style geometry). The obvious benefit is that there is one less part and one less mounting point to deal with. Unfortunately, the NEMA 34 compatible version can only be used with screws as small as 20mm in diameter, so both Y axes cannot use this option.
Spindle Motor
The two common form factors for spindles are cylindrical and square. The cylindrical spindles require a separate clamp to adapt the spindle to a flat mounting surface, while the square spindles have a built in flange.
Spindle mounting is further complicated by the need to ‘tram’ the spindle (very small adjustments to the mounting angle required to keep the cutting axis perpendicular to the XY motion). Part count (which typically reduces stiffness and increases cost) can add up rapidly as different features are required for adapting and adjusting various aspects of the spindle.
Exploratory Design
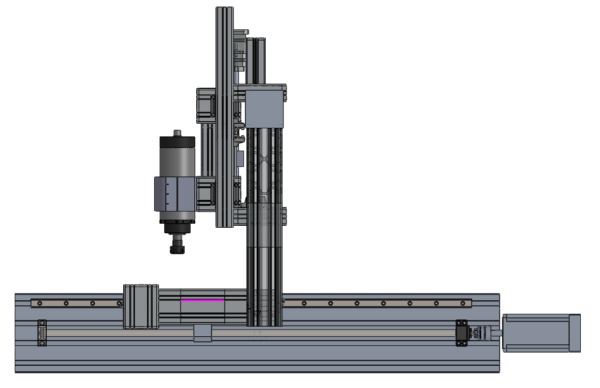
It took many iterations just to get to this point, and while some mirrored or obvious parts are omitted the design intent comes through. The challenge was to try and connect as many pieces as possible without resorting to machined plates (‘easy’ 2D plates made with a bandsaw and drill press are OK). In some areas, like the gantry risers, it worked out decently. In other places, like the gantry carriage, the constraint became difficult to work around.
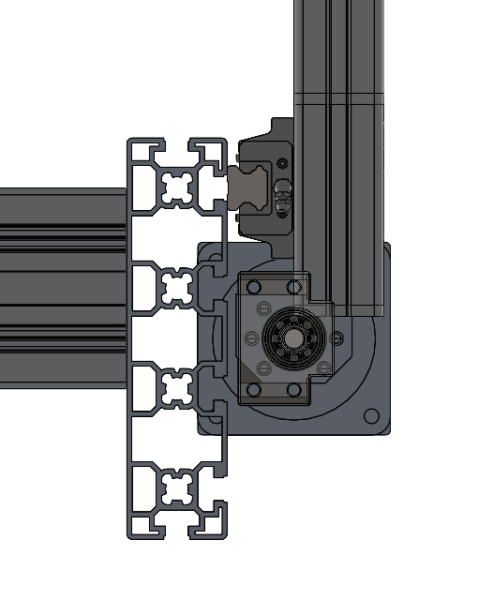
The base of the router consists of a pair of 45mm x 180mm extrusions, each of which mounts a Y axis guide rail, ball screw, and motor. Several (not all shown) cross members of 45mm x 90mm extrusion are preloaded to the two main extrusions by mounting through the sides of the two main extrusions and threading into the holes at the ends of the cross members.
The Y axis bearings are mounted directly to vertical 40mm x 80mm t slot extrusions, where one member is extended up to support the gantry. An orthogonal piece of 40mm x 80mm extrusion joins the two extrusions connected to the bearings and also supports the ball nut housing directly.
The gantry is a long piece of 80mm x 160mm extrusion that is connected to the columns on each end by a preloaded joint where clearance holes in the vertical pieces allow bolts to reach the tapped holes at the ends of the gantry extrusion. One rail is mounted to the front face of the gantry, and another is mounted to the bottom face.
The gantry carriage is a mess of 40mm x 80mm t slot extrusion that forms a ‘C’ to enclose the front, top, and bottom sides of the gantry. The top portion of the C is used to mount the ball nut while the other two sides mount the bearing blocks. The front of the carriage extends upwards past the C and mounts the Z axis rails on a pair of internal faces.
The Z Axis carriage joins two ‘I’ shaped structures made from 40mm x 80mm extrusion (each of which mounts two bearings) with a 40mm x 160mm piece of extrusion that serves as the primary tool mounting surface. In this case, a clamp style mount would be drilled out to work with the T slot pattern and adapt an 80mm circular spindle.
Struggles
Not mounting both of the X axis bearings on the front surface adds complexity, more parts, and reduces gantry clearance. I definitely need to find more knobs to turn in order to justify mounting both rails on the same side of the same extrusion.
The height of the ball screw stackup (distance form the base of the screw support to the top of the ball nut mount) is larger than the height of the bearing stackup (distance from the base of the rail to the mounting surface of the bearing block). This was a complication when setting up all three axes because the bearings would have been better suited for an adapter plate than the ball nut mount. Some kind of ‘U’ shape to the extrusion would have helped, but I was unable to find ‘U’ or ‘C’ extrusions at this scale.
It took many iterations to get the distance from the gantry to the spindle to be less than the axial distance between Y axis bearings. It was eventually achieved with an ‘internal rail’ arrangement, but this design choice drastically increased the complexity of the Z axis.
In general this design relied heavily on a lot of preloaded perpendicular joints between extrusions. Making these joints truly perpendicular is incredibly hard with a simple miter saw. This problem is compounded by the sheer number of joints that end up between the various rails and bearings that must somehow end up extremely square to each other.
Besides the extrusion mounting the X and Y axes rails (which are 1-1.5 meters long) most of the extrusion ended up being used as a small piece in a fairly small assembly (Gantry Riser, X Axis Carriage, Z Axis Carriage). It is almost certainly cheaper, stiffer, and easier to replace these T slot assemblies with monolithic machined plates.
Successes
I was very happy with the way the Y axis base structure and ball screw mounting worked out. I used 45mm pitch extrusion so that the ball screw supports could mount directly to the extrusion (although in this case through a spacer, which I don’t like as much, but would be unnecessary if the ball nut mount was rotated).
Unlike 40mm t slot extrusion, which uses M8 bolts in both the slots and the tapped holes at the end, 45mm extrusion uses M10 bolts in the slots but M12 bolts for the tapped holes. This can make using the threaded hole for preloading difficult, but I was able to find a 45mm x 180mm variant that looked like it could support drilling through holes in between the T slots (instead of through the T slots). This frame design ends up making a great negative space for a spoilboard to live in while elevating the NEMA 34 frame off of the table.
Another feature of the Y axis that I liked was that the gantry riser column interfaced directly with one of the Y axis bearings, due to the shared 40mm spacing. This seems like a huge boon for stiffness, especially compared to skrawny plate-based risers. However, without ‘growing’ either the gantry column or the bearing connector extrusion to fill in the diagonal space between the second bearing and the gantry there isn’t a great load path between those two components.
Although not modeled, the general concept for mounting the Y axis motors was to cut a thin plate that bolts to the tapped holes in the back end of the main Y axis extrusion while supporting the face of the motor. This part would be cheap and easy to make, and provides a ton of stiffness in the directions that matter.
Takeaways
Going through this process definitely highlighted some challenges that need to be solved (mostly related to the X and Z axes), but also some good starting points for the base and Y axis design.
- Don’t shy away from using plates on the X and Z axis carriages. The cost difference will be minimal (for one plate compared to an assembly of 6-8 extrusions with connecting hardware) and the stiffness/accuracy gains are substantial
- Using a plate also allows the use of a reference edge for mounting the bearings or rails in line
- Consider simplifying the Y axis connections with a plate if it allows the screw bearings to mount directly to extrusion and helps transfer load between the gantry and second bearing more effectively
- Something that can add a lot of lateral stiffness to the gantry riser will almost certainly still be necessary
- Using a plate also allows the use of a reference edge for mounting the bearings in line
- Find a way to justify mounting both X axis rails on the same face
- Decreasing the design factor of safety arbitrarily doesn’t feel right, but would probably work
- Increasing the pitch on the Y and X axis screws would reduce the maximum potential force on the tool while stalling (current driving case)
- Larger pitch screws are slightly harder to find and will likely be slightly more expensive
- At lower speeds the motor may not be in the constant power region any more for some of the cutting cases
- At lower speeds screw whip becomes less of a problem, which may unlock faster rapid speeds if the safety factors turn out to be too conservative
