We just moved in to a new place that has a sunny back porch near the kitchen that is perfect for growing herbs. I was excited to try a woodworking project so I made a pair of cedar planter boxes and mounted them to the porch railing with a French cleat.
Problem
When my wife and I cook with a recipe that requires fresh herbs one of the following always happens:
- We buy some fresh herbs at the store but can’t use them up before they go bad
- We use dried herbs or another substitute in the recipe instead (which isn’t always possible)
- We skip the inclusion of an herb to avoid the hassle of the above
Because herbs last a lot longer when still a part of the full plant the obvious solution is to grow your own herbs at home so you can just trim some off when you need them.
We want to be able to grow herbs like dill, oregano, chives, rosemary, thyme, and basil which all require a decent amount of sun. At our house, the back porch is both close to the kitchen and has a lot of sun. The back railing of the back porch stays in the sun the longest and would also keep the plants out of the way of other activities. However, we need to be able to take the plants inside during the winter because it gets too cold for the plants to survive.
Off The Shelf Solutions
There are plenty of window box and railing planters available. Railing planters sit on top of the railing and generally give me an uneasy feeling about tipping over in the wind and falling down 15 feet to the ground. Window box planters can either be mounted directly through their long edge or supported by railing hooks. There are also plenty of materials to choose from when selecting a planter box:
- Plastic: Inexpensive but potentially flimsy or brittle (except maybe HDPE). Can look out of place in an environment made of wood.
- Composite: Sturdier than plastic and can more easily appear to be wood, especially when painted.
- Metal: Either very heavy or requires a liner to fill in the gaps of the wire frame. Potential corrosion issues.
- Ceramic: Heavy and expensive.
- Wood: Sturdy but will degrade over time. Looks great. Can be cheap or expensive, spanning similar ranges of durability.
Aesthetics aside, I think that the best material for a planter box is fake wood composite or HDPE. It is relatively inexpensive and will last forever. Both are easy enough to modify that you can customize them to your mounting needs if necessary. However, if you want the look of unpainted natural wood than there is no substitute for real wood.

A pair of good wooden planter boxes that compromise price and durability costs about $170, including shipping. These come untreated and unlined. A similar form factor made from cedar would cost only about $85 in lumber (even at today’s abnormally high prices!). When not including the glue, nails, and woodworking equipment required to make the box it definitely seems like a way better deal to build one yourself. Plus, its a fun spring project!
Design
Besides cost, the other advantage of building your own planter box is that you can make small alternations to the available designs in order to fit your use case perfectly. The two special considerations I have (compared to someone just planting some flowers in a box) is that I need to be able to move the box inside during the winter and I need to make sure all materials and treatments are non-toxic and food safe because I plan on eating what is being grown in them.
Requirements
- Minimum 5 year (ideally 10) service life outdoors in the sun and rain, but not ice and snow
- Holds at least 6 different herbs
- Securely connected to the porch railing, but can be lifted moved inside during the winter by a single person
- Food safe material and chemical selections
- Minimize upfront and maintenance costs
Material Selection
Of the common rot-resistant woods cedar is the most available near me. I can easily get it in nominal 1 x 2,4,6, and 8 inch cuts, finished S1S1E. As far as I can tell the price per area is fairly constant across those sizes so there is no real benefit in aggregating smaller boards myself.
Lining the inside of the box with plastic sheet is a cheap and easy way to prolong the lifespan of the structure by eliminating the constant contact between moist soil and wood. However, because the plastic may develop holes or leak over time the wood should still be treated with a non-toxic protectant if possible.
The internet is full of opinions on what is or is not safe to use when treating wooden planter boxes for growing food. The least common denominator is that garden specific stains and waterproofers are definitely OK to use. I also prefer a one-time application during the build instead of constant oiling every year.
Mounting Style
There are plenty of brackets available that can help mount a planter box on or beside a railing. Some simply cradle the planter box while others provide hard mounting points. What I don’t like about these brackets is that when the planter box is removed from the rail you are stuck with a big metal bracket sticking out from either the railing or the planter box.
Directly mounting the planter boxes to the railings was not an option for me because I want to be able to bring the boxes inside during the winter.
Another less common option I saw was the use of French cleats to make modular planter walls. While I don’t think having reorganizable plant shelves is very important (why wouldn’t you need to shuffle plants around on a wall? Maybe to match sunlight in different seasons?) the French cleat mounting design did seem like a great way to make moveable low-profile planter mounting brackets. The downside is that there is no positive retention (so wind or an accidental bump could knock it off the mount) but a simple clip could fix that problem.
Size
Most planter box designs appear to have a profile of about 6″ wide by 6″ deep, give or take an inch or so. Considering the cedar available to me for the project comes in 6″ and 8″ nominal widths (but really slightly less because of milling) it shouldn’t be hard to match that same size. By using a 6″ board as the base, and an 8″ board as the front and back (overlapping the base) the final interior dimensions should be about 6″ x 6″.
Near me cedar is sold mostly in 8 foot lengths, so my goal is to get as much planter box as I can from some combination of 8 foot long boards. Each additional planter box wastes wood on the vertical end faces so building fewer is more efficient. Making one giant four foot long planter box is efficient but impractical so I decided to make two approximately 2 foot long boxes.
Joints
While beveled corners, framed slats, finger joints, and other options can look great they add complexity to the design that I am not skilled enough to manufacture. I want to be able to simply cut some boards to length, glue them together, and nail them in a few places to hold until the glue dries. For this reason I chose to use a simple butt joint at each corner. In the future an extra set of boxes could be a great excuse to learn a new woodworking technique!
For securing the French cleat to both the planter box and the railing I decided to use screws instead of glue. The cleat has to react a large moment load through whatever it mounts to and relying on just glue and brad nails for that case did not seem appropriate.
Layout

The basic layout of the box involves a 1″x6″ cut piece forming the base of the planter, raised up by 1/4″, and surrounded by four other pieces that mount to the thin edges of the base. The two small sides are also cut from a 1″x6″ board to match the width of the base while the two long sides are cut from a larger 1″x8″ board so the grain is horizontal. The long sides completely covers the end of the short sides so that the view from the front is a single piece of wood. Drainage holes are included in the bottom, which is why the base is raised up slightly off the ground.

On the back face the French cleat is mounted, along with some spacers. I added two of these boxes to a simple model of my back porch railing as a quick sanity check on size and mounting points.

The mating French cleat connects to three posts of the railing while the attached spacers press on the two outer vertical posts. Technically French cleats don’t need a lower support because the large moment load is what locks them in place, so I set the spacers back 1/8″ to mostly just compensate for droop and a lack of stiffness.

Build
To help myself with the build I made a set of drawings to follow. I normally don’t think about details and tolerances until I get the to drawing stage of the design, so even for something simple like a box it is helpful to force myself to do all of the thinking before I am halfway done building the project! Also, I find that having all of the measurements, quantities, and dimensions I need to build something printed out ahead of time is way easier than referencing a CAD model.


Resources
- Materials
- Cedar board 1″ x 8″ x 8′, dried
- Cedar board 1″ x 6″ x 8′, dried
- Cedar board 1″ x 2″ x 8′, dried
- Waterproof outdoor wood glue
- 6 mil (0.006″) thick plastic sheet
- Non-toxic cedar stain
- ~50 18 gauge brad nails
- 12 x 1″#8 flathead wood screws
- Tools
- Miter saw
- Table saw
- Air compressor
- Brad nail gun
- Staple gun
Structure
Using the drawing dimensions and quantities as a cut list I went to work cutting everything to length on the miter saw. Afterwards, I trimmed down the unfinished edge on my S1S1E board to make them S1S2E (as well as the proper width) using my tablesaw.

I left the inside large face unfinished because it was going to be covered by a plastic sheet anyway. In hindsight, sanding it down would have made the stain application later much easier. I also took this opportunity to drill three drain holes in the bottom piece.
At this point I laid the boards together to check the fit and discovered that my 1″x8″ board piece was much more warped then I initially thought. It would not sit flat against the vertical side pieces. I mitigated this problem by sanding away the convex surface of each end of the front and back boards, but in the future I should probably just get the right tools to make my wood flat and parallel.


After that modification the fitup was great so I proceeded to glue and nail everything together.

I did a quick test fit on the porch to make sure everything sat right. I also added the hook and eyelet used to secure the planter box to the railing.


Coating
The two boxes got a double coating of the protective stain which gave them a beautiful color. They dried overnight before the next step.

I cut out rectangles of plastic sheet one inch longer in each direction than the equivalent unfolded flat shape of the planter boxes (about 20″ x 36″). After shoving them into the bottom of the boxes and pressing them out flat, I folded the top edge of the plastic back on itself and stapled it to the top of the inside edge of the box. The critical part of this process is to only staple at the top edge and make sure that the two short sides are folded up neatly so that there is no path for water to exit the plastic and contact the wood.


After securing the plastic I used a random sharp round thing to puncture the sheet at each of the three drain holes. Finally, two layers of coarse burlap mesh were added to the bottom to give water a consistent path to the drain holes while keeping the soil from washing out with it.
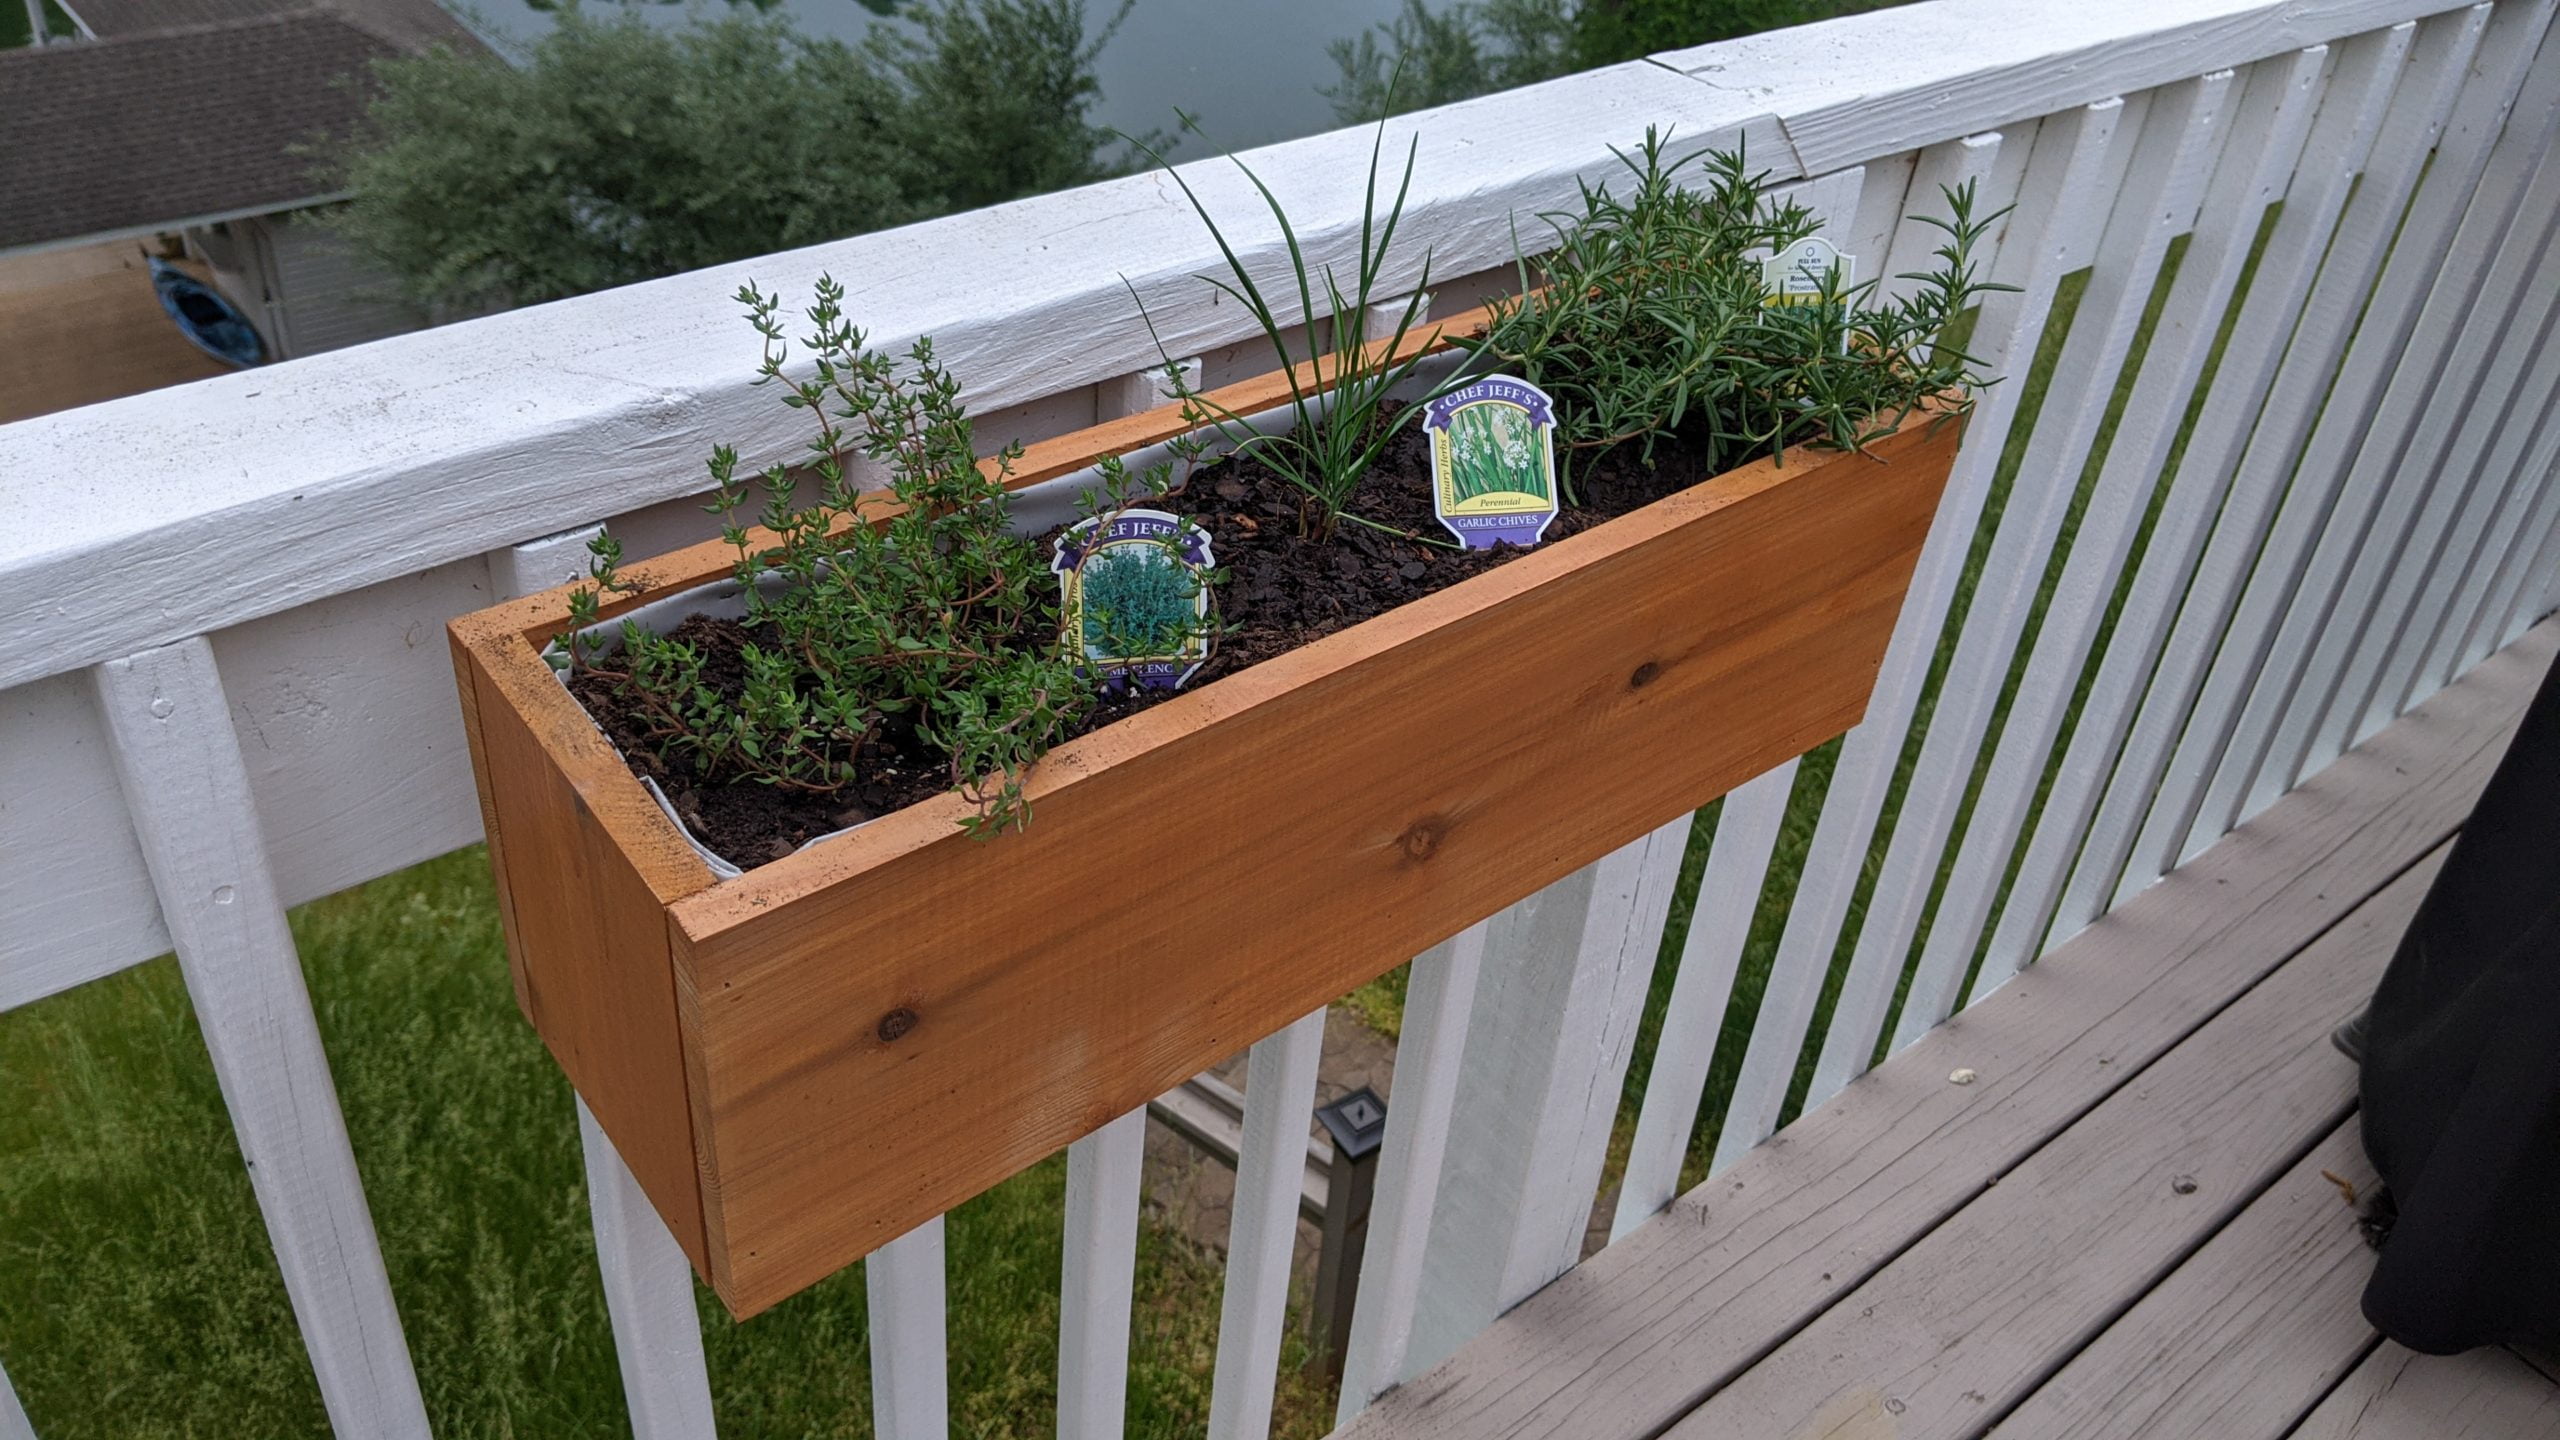
After that the only thing left to do was plant the herbs and hang the boxes on the porch! We were able to find parsley, rosemary, thyme, Thai basil, and chives at our local garden store. The last spot is reserved for either oregano or dill if we can ever find it.

This is the most extra thing I have ever read, but I am not even slightly surprised. Never change Mr Burks.
I would please like to preorder this if we get a house with a yard.