In the router architecture post I decided to use linear rail (as opposed to round shaft or V rollers) to support all of my axes due to the high stiffness and load bearing capacity. Using outputs of other analyses that have been done since then (inertial and tool loading, maximum motor torque) I can now determine the proper bearing size and spacing for each axis.
Analysis Approach
Overview
Bearing manufacturers typically provide both a maximum dynamic load rating and a larger maximum static load rating for their bearings. The goal is to design a system such that the static load rating (typically with a factor of safety of 1-3) is never exceeded (even in off-nominal machine crash scenarios) while the dynamic load rating is more of an indicator for running life. Bigger bearings have more capacity, but a higher price, so the goal is to design a machine that can use the smallest bearings possible to efficiently handle all relevant forces.

Recall that the CNC router will have a gantry style layout. The spindle is mounted to the Z axis, which moves up and down. The Z axis is mounted to the X axis carriage which moves laterally across the gantry. The gantry is supported by two columns (one on each side of the table) that move horizontally along the router table.
For each axis there are four bearings and two parallel rails to fully constrain the motion. Regardless of what global direction the ‘X’, ‘Y’, and ‘Z’ machine axes face, each axis can be represented with an identical ‘bearing coordinate system’
In this coordinate system the three orthogonal axes are:
- Axial: The direction of motion of the machine axis, coplanar with all of the bearings (with the direction matching the sign of the machine axis)
- Lateral: The direction perpendicular to the axial direction that is still coplanar with all of the bearings (chosen arbitrarily between two solutions)
- Normal: The direction perpendicular to the other two (and coincidentally perpendicular to the plane of the bearings) with the sign given using the right hand rule: \(\vec{Normal} = \vec{Lateral} \times \vec{Axial}\)
In this coordinate system the bearings are numbered based on what ‘quadrant’ they are in when you consider the Lateral and Axial vectors to be a mathematical ‘X’ and ‘Y’ respectively. Each bearing can resist a load in the lateral and normal directions, but not the axial direction. Twisting (‘moment’) loads are assumed to be broken into pairs of loads (‘couples’) on corresponding bearings.
Tool and inertial loads can be represented in this coordinate system with geometric offsets based on both static design offsets (like gantry height) and axis positions (which are constantly changing, but typically have a ‘worst’ position). By using the same coordinate system for all axes the equations for calculating individual bearing forces based on tool and inertial loading can be reused and compared.
Key Values
The two primary load cases being considered (which can be active simultaneously) are tool loading and inertial loading. Both load cases can be represented as a vector acting in the bearing coordinate system, acting at a position also described by a vector in the bearing coordinate system. The result of each load is a force on and moment about each of the axes in the bearing coordinate system that must be reacted by the bearings (which can themselves be represented as vectors).
- Tool load: \(\vec{F_{T}}\)
- Inertial load: \(\vec{F_{I}}\)
- Tool position: \(\vec{P_{T}}\)
- Inertial position (center of gravity): \(\vec{P_{I}}\)
- Total bearing linear load: \(\vec{F_{B}}\)
- Total bearing moment load: \(\vec{M_{B}}\)
All of these vectors can be represented by their individual components in the three orthogonal axes of the bearing coordinate system. For example, \(\vec{F_{B}}\) is composed of \(\vec{F_{B_{lateral}}}\), \(\vec{F_{B_{axial}}}\), and \(\vec{F_{B_{normal}}}\)
In order to translate the force and moment reactions from the bearing coordinate system into individual loads on the bearings the only thing that needs to be known is the axial and lateral spacing of the bearings.
- Axial bearing spacing: \(l_{axial}\)
- Lateral bearing spacing: \(l_{lateral}\)
Representing the position of each bearing as a vector can make the equations even cleaner, but I actually think there is value in breaking down the equations even further into individual components of the inputs forces (lateral, axial, and normal components of the Force and Moment). This gives a better insight in to what specific inputs can end up causing extremely large bearing loads.
Calculation
The total linear load applied to the bearings is a simple vector sum of the input loads.
\(\vec{F_{B}} = \vec{F_{T}} + \vec{F_{I}}\)This vector can be represented by the sum of individual component loads (ignoring the axial load, which is reacted by the ball screw and not the bearings):
- \(F_{B_{lateral}} = F_{T_{lateral}} + F_{I_{lateral}}\)
- \(F_{B_{normal}} = F_{T_{normal}} + F_{I_{normal}}\)
The total moment load applied to the bearings is a simple vector sum of the input moment loads. The input moment loads are the cross product of the load with the vector representing the position (in the bearing coordinate system) where the load was applied.
\(\vec{M_{B}} = \vec{F_{T}} \times \vec{P_{T}} + \vec{F_{I}} \times \vec{P_{I}}\)This vector can also be represented as individual component torques around the three axes of the bearing coordinate system using the rules of cross products:
- \(M_{B_{lateral}} = (F_{T_{axial}} P_{T_{normal}} – F_{T_{normal}} P_{T_{axial}}) + (F_{I_{axial}} P_{I_{normal}} – F_{I_{normal}} P_{I_{axial}})\)
- \(M_{B_{axial}} = (F_{T_{normal}} P_{T_{lateral}} – F_{T_{lateral}} P_{T_{normal}}) + (F_{I_{normal}} P_{I_{lateral}} – F_{I_{lateral}} P_{I_{normal}})\)
- \(M_{B_{normal}} = (F_{T_{axial}} P_{T_{lateral}} -F_{T_{lateral}} P_{T_{axial}}) + (F_{I_{axial}} P_{I_{lateral}}-F_{I_{lateral}} P_{I_{axial}})\)
Each bearing can only resist a force in the normal and lateral directions. These forces are either directly applied (and shared equally among all four bearings), or result from the bearing’s participation in a moment-reacting force couple. For each of the four bearings the lateral (\(F_{Bn_{lateral}}\)) and normal (\(F_{Bn_{normal}}\)) applied loads can be calculated, with slight differences in the sign of the moment term depending on which bearing the force is calculated for.
- \( F_{B1_{lateral}} = \frac{F_{B_{lateral}}}{4} – \frac{M_{B_{normal}} }{2 l_{axial}} \),\( F_{B1_{normal}} = \frac{F_{B_{normal}}}{4} + \frac{M_{B_{lateral}}}{2 l_{axial}} – \frac{M_{B_{axial}}}{2 l_{lateral}} \)
- \( F_{B2_{lateral}} = \frac{F_{B_{lateral}}}{4} – \frac{M_{B_{normal}} }{2 l_{axial}} \),\( F_{B2_{normal}} = \frac{F_{B_{normal}}}{4} + \frac{M_{B_{lateral}}}{2 l_{axial}} + \frac{M_{B_{axial}}}{2 l_{lateral}} \)
- \( F_{B3_{lateral}} = \frac{F_{B_{lateral}}}{4} + \frac{M_{B_{normal}} }{2 l_{axial}} \),\( F_{B3_{normal}} = \frac{F_{B_{normal}}}{4} – \frac{M_{B_{lateral}}}{2 l_{axial}} + \frac{M_{B_{axial}}}{2 l_{lateral}} \)
- \( F_{B4_{lateral}} = \frac{F_{B_{lateral}}}{4} + \frac{M_{B_{normal}} }{2 l_{axial}} \),\( F_{B4_{normal}} = \frac{F_{B_{normal}}}{4} – \frac{M_{B_{lateral}}}{2 l_{axial}} – \frac{M_{B_{axial}}}{2 l_{lateral}} \)
The output of all of this analysis is the total non-axial force on each bearing (to be compared to the allowable load from the spec sheet). This is the geometric mean of the lateral and normal forces on each bearing.
\(F_{B_n} = \sqrt{F_{Bn_{lateral}}^2 + F_{Bn_{normal}}^2}\)Visualization
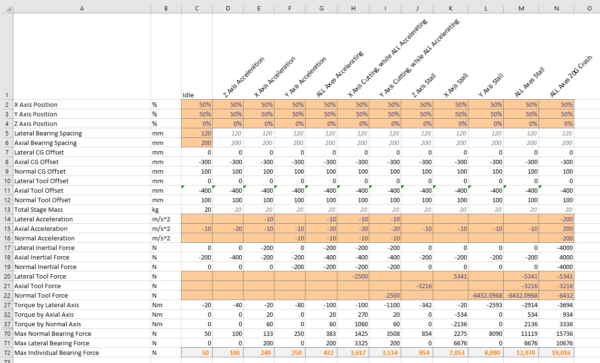
Because there is so much freedom in the early design stage to alter the inputs to an analysis in order to impact the results I like to set up a simple spreadsheet where I can easily modify the inputs and quickly view the impact on intermediate and final values of the analysis. In this case I cascaded the analysis down the rows of the spreadsheet (first listing the inputs, then calculating the components of the total force and torque vectors, and finally the normal and lateral forces on each bearing) while I filled out different load cases across the columns.
Each load case includes variable inputs like:
- Position of each axis (as a percent of total travel distance)
- Acceleration of each axis (both target 1G loads and a 20G ‘crash’ scenario)
- Tool force on each axis (both to represent normal cutting loads as well as ‘maximum’ loads capable of each axis
I also left room to adjust (and examine the impact of) axial and lateral bearing spacing as well as static geometric offsets (like gantry height). Once the detailed design has been complete the geometric constants can be adjusted to match the final design and one final analysis double check can be performed.
The ultimate output for each load case is the largest total force felt by any individual bearing. This can be combined with a factor of safety and compared to the bearing catalog to find the smallest acceptable bearing size. A factor of safety of 2 will be used for all load cases except the most extreme (20G inertial load and maximum torque on the tool from each axis.)
Because all of the analysis happens in the bearing coordinate system this spreadsheet can be reused for the bearing analysis on each axis, with only slight differences in how some of the initial inputs are calculated.
Z Axis
Bearing Coordinate System Alignment
- Axial bearing axis points along the positive Z machine axis
- Lateral bearing axis points along the positive X machine axis
- Normal bearing axis points along the negative Y machine axis
Assumptions
- The bearings are mounted to the X axis carriage and the rails move up and down with the spindle
- The axis of rotation of the spindle is line with the center of gravity of the Z axis
- The axis of rotation of the spindle and the center of gravity are located directly between the two bearing rails (no lateral offset)
- The worst-case position for the Z axis is with the tool all the way down (this maximizes the moment arm in the axial direction which must react forces in the normal and lateral directions)
- The X and Y axis positions do not impact the forces on the Z axis bearings
Sensitivity Study
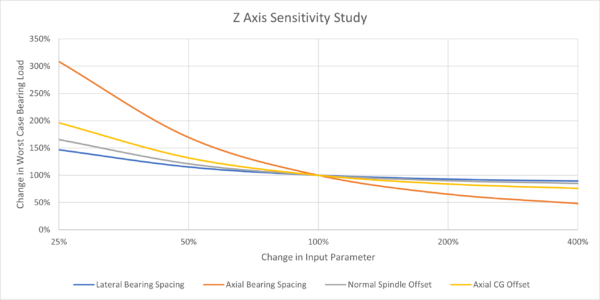
The baseline values used for this sensitivity study result in a worst case bearing load of 37.8 kN when all axes are stalled with 1G inertial loading (after FOS 2.0) and 40.7 kN when you also include a 20G acceleration (FOS 1.5). For reference, the cutoff for using 20mm HIWIN rails is 36.7 kN and for 25mm rails 52.8 kN, so it seems wise to try and reduce the load to use 20mm rails.
- Lateral Bearing Spacing: 120 mm (rails inside 4 x 40mm-t slot framing)
- Axial Bearing Spacing: 120 mm (arbitrary)
- Normal Spindle Spacing: 100 mm (arbitrary)
- Axial CG Offset: 200 mm (arbitrary)
The most impactful parameter was by far the axial bearing spacing. This makes intuitive sense because the longest moment arm in this joint is in the axial direction, which must be reacted by the bearing couple spaced apart in the axial direction.
Adjusting the axial bearing spacing to 140mm is enough to reduce the load from the worst case scenario into the regime where the 20mm rails can be used. Knowing how sensitive the design is to this dimension allows me to easily add margin to this bearing setup by increasing it further.
Knowing that the design is relatively insensitive to the lateral bearing spacing opens up the opportunity to potentially base the rail spacing on 30mm t slot frame (90mm lateral bearing spacing) instead of the assumed 40mm pitch.
X Axis
Bearing Coordinate System Alignment
- Axial bearing axis points along the positive X machine axis
- Lateral bearing axis points along the negative Z machine axis
- Normal bearing axis points along the negative Y machine axis
Assumptions
- The bearings are mounted to the X axis carriage and the rails are fixed to the gantry beam
- The center of gravity of only the X axis carriage is at the origin of the bearing coordinate system (so the CG of the combined X and Z axes is proportionally between the two)
- The axis of rotation of the spindle and the center of gravity are located directly between the two sets of bearings (no axial offset)
- The Z axis bearing coordinate system origin is only offset in the normal direction
- The worst-case position for the Z axis is with the tool all the way down (this maximizes the moment arm in the lateral direction which must react forces in the normal and axial directions)
- The X and Y axis positions do not impact the forces on the X axis bearings
Sensitivity Study
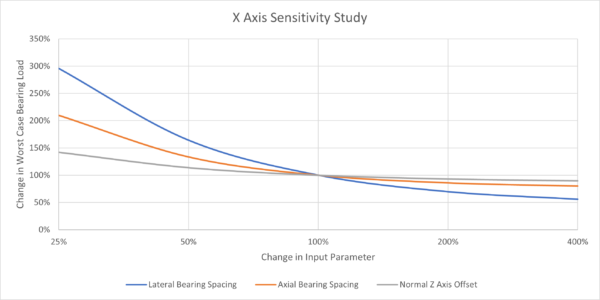
The baseline values used for this sensitivity study result in a worst case bearing load of 47.4 kN when all axes are stalled with 1G inertial loading (after FOS 2.0) and 41.0 kN when you also include a 20G acceleration (FOS 1.5). For reference, the cutoff for using 20mm HIWIN rails is 36.7 kN and for 25mm rails 52.8 kN, so it seems wise to try and reduce the load to use 20mm rails.
- Lateral Bearing Spacing: 120 mm (rails inside 4 x 40mm-t slot framing)
- Axial Bearing Spacing: 120 mm (arbitrary)
- Normal Spacing from Z Axis Bearings: 100 mm (arbitrary)
The most impactful parameter was the lateral bearing spacing, for all the same reasons that the axial bearing spacing was impactful to the Z axis. Unfortunately, unlike with the Z axis, this time the spacing between the rails needs to increase. One of the selling points of T slot frame CNC’s is that you can attach the rails directly to the slots, but getting more than the 120mm spacing from the 4 x 40mm profile assumed can be tricky.
Putting the rails on opposing faces of a 4 x 40mm profile (the short edges) can get about 200mm in lateral spacing. This results in loads around 35kN, which just closes the 20mm rail profile. It will need to be traded in the detailed design phase whether putting the X axis rails on opposing sides of the gantry is worth doing to save from using the 25mm rail profile size.
Alternately, quadrupling the axial bearing spacing and cutting the normal offset in half (the less sensitive parameters available) can just barely get the worst case load to 36kN. This seems a bit extreme, but it is good to know that it is an option.
Y Axis
Bearing Coordinate System Alignment
- Axial bearing axis points along the positive Y machine axis
- Lateral bearing axis points along the positive X machine axis
- Normal bearing axis points along the positive Z machine axis
Assumptions
- The bearings are mounted to the base of the gantry columns and the rails are fixed to the sides of the table
- The center of gravity of the Y axis gantry only is located directly below the X axis carriage (in its center position) 1/3 of the way to the Y axis bearing plane from the center of the X axis bearings
- The worst-case position for the Z axis is with the tool all the way up (this maximizes the moment arm in the normal direction which must react forces in the lateral and axial directions)
- The worst case position for the X axis is at one of the extremes because it forces one of the gantry columns to react all of the loads on the tool and induces a large moment around the normal axis
Sensitivity Study
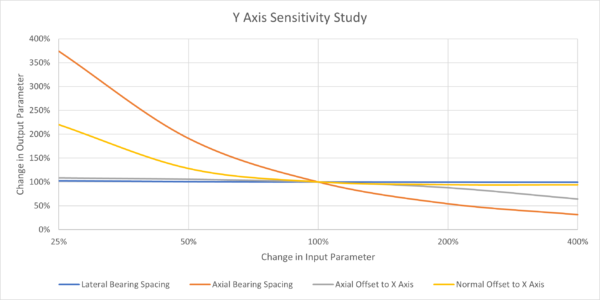
The baseline values used for this sensitivity study result in a worst case bearing load of 31.4 kN when all axes are stalled with 1G inertial loading (after FOS 2.0) and 46.3 kN when you also include a 20G acceleration (FOS 1.5). For reference, the cutoff for using 20mm HIWIN rails is 36.7 kN and for 25mm rails 52.8 kN, so it seems wise to try and reduce the load to use 20mm rails.
- Lateral Bearing Spacing: 1600 mm (rails outside the work area)
- Axial Bearing Spacing: 200 mm (arbitrary)
- Axial Offset to X Axis: 150 mm (places tool at center of bearings)
- Normal Offset to X Axis: 400 mm (places tool tip at bearing plane when all the way down)
The most impactful parameter is the Axial bearing spacing by far. This is mostly driven by torque around the normal axis caused by too loading due to the extreme position of the X axis carriage. There is plenty of room to increase that bearing spacing, and at only 280mm the driving load case falls below the threshold needed to use 20 mm rails.
The design is still quite sensitive to the normal offset to the X axis. This probably explains why some designs elevate the gantry bearings above the cutting surface, and plays into the maximum clearance you can get out of a gantry system.
So long as the axial bearing spacing is large enough the design appears to be relatively insensitive to the axial offsets to the X axis bearings. I had imagined that perfectly centering the tool tip on the Y axis bearing coordinate system would be ideal, but biasing the CG slightly closer to the center of the bearings may be more efficient.
Conclusions
It looks like there is a path towards using 20mm rails for every axis. This is very convenient from the perspective of having common parts and interfaces. In general, adjusting the axial or lateral bearing spacing was enough to manipulate each joint to be within the capabilities of the 20mm rail bearings. The exception is the X axis, where there may be difficulty in designing rail spacings beyond the slots in 40mm t slot extrusion.
| Axis | X | Y | Z |
|---|---|---|---|
| Bearing Size (mm) | 20 | 20 | 20 |
| Min Lateral Spacing (mm) | 200 | 1600 | 120 |
| Min Axial Spacing (mm) | 120 | 280 | 140 |
These are all minimum distances required to achieve no margin on the target factors of safety. Because of uncertainties in this stage of the design process related to axis mass and other geometries I will target slightly larger spacing where possible. Additionally, as I flesh out the various spacings between axes I can use the sensitivity studies from this step in the process to inform my choices.
With all of this initial sizing complete I can now jump into CAD and begin to tie together all of these motion components using t slot framing, off the shelf supports, and simple aluminum plates.


